One of the ongoing projects I’ve played with is using .NET apps to capture data from my MQTT broker, from X10 sensors, and from a wide variety of 433 MHz devices whose signals I capture using RFLink. I’d like to offload those processes to a dedicated workstation, as well as combining them into a single app to reduce the resources required to run.
The best way to meet that goal is to rewrite the various programs into a single console app (think DOS program, run from the command line or run as a service), which gives me an excuse to play around with C#. There’s not a lot of new ground to cover with this, but I think there are a few points of interest for you. Tonight’s is going to be using ConfigurationManager.
When you want to offload a process from your dev machine to a workstation, there are a few things that you want to make configurable, so that you don’t have to recompile the program whenever something changes. Two great examples of this are the COM Port used for RFLink’s Arduino board as well as the connection string that lets you access your SQL server.
There are different ways to provide this information to your app. Along with several other options, you can use command line switches, read a text file, or include the data in app.Config – which is the option we’re choosing today.
Start a “New Project” in Visual Studio, selecting a C# Console App (.NET Framework) – don’t use (.NET Core) as that’s a different critter that we’re not diving into today.
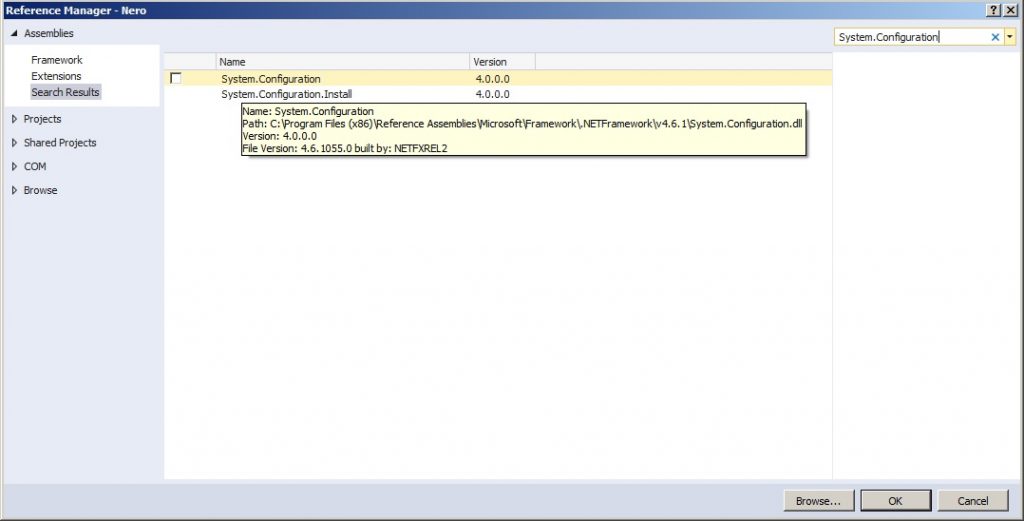
Here’s the key to making this work and, for whatever reason, most examples don’t tell you this – go to Solution Explorer and right-click References. Select Add Reference and search for “System.Configuration” and add it.
Go back to Solution Explorer and double-click App.config.
Here’s the App.config XML that I used (with different values in connectionString):
You’ll need to substitute your SQL server values –
DataSource = The URL or IP of your SQL server
Initial Catalog = the name of your database
Persist Security Info = True (Windows will remember your password)
User ID = your SQL user
Password = your SQL password
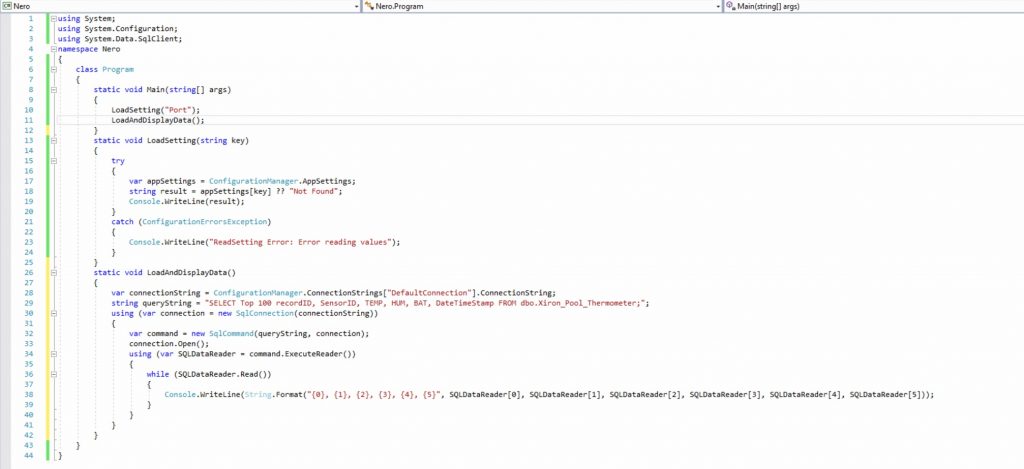
The code for the console app is just as simple as the XML:
The LoadSetting function reads the key value pair from appSettings (in App.config) specified when you call the function in Main.
The LoadAndDisplayData function grabs the connectionString value from App.config to connect to our SQL server. I could also have stored the value for queryString there, but it is easier to have it here for illustrating the next part.
We set the value for queryString. My real life table has 6 columns – recordID, SensorID, TEMP, HUM, BAT, and DateTimeStamp. My query selects the top 100 records (ascending by default) from the table.
The query is returned in an array (zero based), which outputs to the screen using Console.Writeline, with the individual array elements selected from the query results. In this example, I use all 6, but I could easily grab elements 0, 3, and 5 to illustrate.I could also have only selected two fields in the query, which would have given us elements 0 and 1 in the array.
When you execute the program, it will open a DOS window, execute its code, and close. In order to get a better view of my results, I opened a command prompt and navigated to my project’s\bin\Debug folder and executed the compiled file there. You can see it outputted the value COM3 and then the data from the query.
That’s easy enough, right?
SmarterHome.club is the website for our Facebook community, The Smarter Home Club – which is an umbrella for all kinds of smart home technologies – home automation, security, custom electronics, weather stations, alternative energy, you name it. DIY focused.
If you’re interested in joining the Smarter Home Club’s Facebook group, please follow this link:


